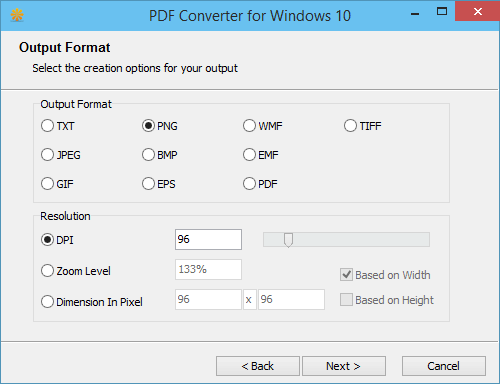
Step by step wizard helps you convert PDF to a specific image format,
1. Start the PDF Converter for Windows 10 software.
2. Click Next button to proceed to the "Source PDF File" step.
3. Select a single file for single conversion or select a folder for batch conversion.
4. Click Next button to proceed to the "Conversion Options" step.
5. Specify the "Start page" and "End page". By default, the end page is 1, you can click the "Get Page Count" button to change it to the end page of your PDF file. For batch conversion, this button is not available, since the page count of a folder of PDF files differs. If you want to convert all pages in all PDF files, just enter 999999 (six nines), or just check the "Convert all pages" option.
Note: Once you check the "Convert all pages" option, any value input in "Start page" and "End page" columns will be totally ignored.
Tips: If you want to skip certain page or pages, just enter the page number or numbers in the "Skip Page" column. For example, you don't want to convert Page 2 and Page 13, just enter "2, 13" or "2 13" (without the double quotation marks) in the "Skip Page" column.
You can opt to convert only the odd pages or even pages by checking the appropriate options.
6. Click Next button to proceed to the "Security Options" step.
7. You can click the "Check Now" button to analyze the security status of your source PDF file or files. After checking, if at least one of your PDF files is encrypted, and you will be given three options. Choose the option matching your case.
Note: Providing the owner password (aka. master password) for encrypted PDF files, in most cases, helps produce better conversion results. If you don't know the password, just choose Skip.
8. Click Next button to proceed to the "Output Format" step.

9. Select the file type (aka. file format) for your output image files. Windows Bitmap (BMP), Portable Network Graphics (PNG), JPEG Format (JPG), GIF Format (GIF), Encapsulated PostScript (EPS), Windows Meta File (WMF), and Enhanced Meta File (EMF) are all for images.
10. Once you make your choice by clicking your mouse button, and you will be given the options for output resolution. DPI and Zoom Label are correlated. 72 DPI is for 100% Zooming, i.e. the original size.
Note: DPI is short for Dot Per Inch, which is a measuring unit for resolution. Zoom Level is a jargon to measure the scale of magnification or shrinking.
Tips: You can specify customized height and width for your output by choosing "Dimension in Pixel". Here the word Dimension is defined as Width x Height. If you wish to preserve the proportion of the original PDF pages, you should check either the "Based On Height" or "Based On Width" option to re-calculate the output size based on either height or width.
11. Click Next button to proceed to the "Output Location" step.
12. You need to specify the output file name for single file conversion; you need to specify the output path (aka. folder or directory or location) for batch conversion.
Note: A PDF file with more than one pages, when converted into image format, will be turned into multiple image files. For example, a 3-page PDF file comes with the filename "BusinessPlan.PDF" will be converted into three image files, BusinessPlan_p1.JPG, BusinessPlan_p2.JPG, and BusinessPlan_p3.JPG.
Tips: You can define the rule for file naming. The default file naming convention is %f_p%p, where %f stands for filename, in the example above, it is "BusinessPlan"; %p stands for page number, in the same example, it is 1, 2, and 3 separately. If you want to change the naming rule, just check the "Multiple pages naming convention" option, and make changes as you prefer.
13. Before clicking the Next button to proceed to the "Conversion In Progress" step, you can check the option "Suppress all pop up dialogs in the conversion". This will give you a smooth and silent conversion in the next step without any user interaction.
14. In the process of conversion, you can click Cancel button at any time to abort the conversion. When the process is completed, you will see the message reporting the status and result of the conversion. Click "Finish" button to close the program.